The Fisheye-Hemi is a plug-in for Photoshop or Aperture. The version we used was for Photoshop CS3 on a Mac. The Plug-In comes with three different filters, one for each type of fisheye: Circular, Full Frame, and Cropped. Once the plug-in is installed, the filters are accessed through the Filter menu. According to Image Trends, the creator of the Fisheye-Hemi, the most important aspect of the plug-in is “to not distort people, no matter where they are in the image.”

How does it work?

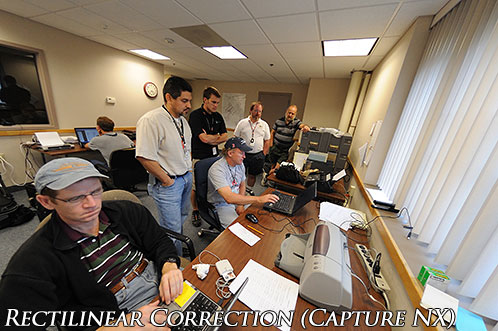
Most fisheye correction tools works by mapping 180-degree fisheye view into a rectilinear view. Essentially, this straightens all of the lines of the image and gives you a field of view very similar to that of an ultra-wide angle lens. This can be great for certain applications (architecture, landscape) but usually results in heavy perspective distortion of people or objects. It also results in the loss of a good amount of the original image data (mostly on the edges). Below is an example of what transforming a fisheye image to a rectilinear image would look like.

Nikon D3 (DX Crop Mode)

Nikon D3 (DX Crop Mode) with 10.5mm f/2.8 | Image Courtesy of Paul Gardner

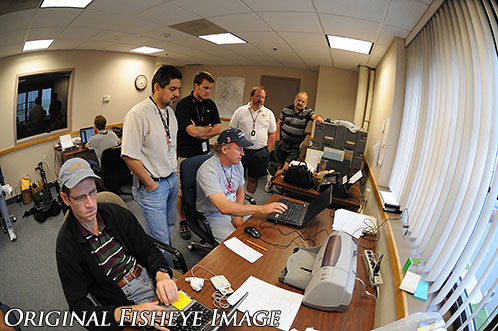
Notice how the rectilinear correction distorts most of the subjects in the shot, especially those in the corners of the image. This view is very typical of a rectilinear image since its purpose is to straighten all of the lines. Also, notice how some of the original image is missing due to the rectifying of the image. The Fisheye-Hemi Plug-In differs because it mostly straightens the vertical lines, provides a much more “normalized” view, and still retains most of the original image. Let’s see how it works.

Nikon D3 (DX Crop Mode)

Nikon D3 (DX Crop Mode) with 10.5mm f/2.8 | Image Courtesy of Paul Gardner

For this image I used Fisheye-Hemi 2, which is designed for a fisheye lens that covers the full frame of the image and provides a 180-degree field of view. Notice how the Fisheye-Hemi image contains much more of the original image than the rectilinear correction. The other thing to look at is how the right and left of the frame have been straightened out, but you still have some of the “fisheye” look on the top and bottom of the frame. The most important thing to look at is how the people in the image appear very normal and not distorted.

Camera Compatibility

The Fisheye-Hemi is compatible with most camera and fisheye lens combinations (a full list can be found here). Circular fisheyes are corrected with Hemi 1, full frame (180-degree view) fisheyes with Hemi 2, and cropped fisheyes with Hemi 3. Unfortunately I was not able to get any images from a circular fisheye for the review, but I was able to get a shot from a cropped fisheye:

Canon EOS 1D Mark II N

Canon EOS 1D Mark II N with 15mm f/2.8 | Image Courtesy of Camilo Arevalo

The distortion and amount of correction is not as great in this case since you are using a fisheye designed for a full-frame sensor on a slightly cropped body. Even though there is only a slight amount of correction with this filter, you can clearly see it makes a difference on the people.

What About Non-People Shots?

Even though the Plug-In is made specifically to make people shots look more pleasing, it also produces some very interesting effects with non-people fisheye shots. Here are a couple of examples:

Nikon D300
Nikon D300

Nikon D300 with 10.5mm f/2.8

Canon EOS 1D Mark II N

Canon EOS 1D Mark II N with 15mm f/2.8 | Image Courtesy of Camilo Arevalo

Nikon D3 (DX Crop Mode)

Nikon D3 (DX Crop Mode) with 10.5mm f/2.8 | Image Courtesy of Paul Gardner

Conclusion

If you own a fisheye lens, this software is an extremely useful tool. It makes your fisheye lens more practical for everyday use and not just for special effect shots. The only complaint I had is that the software does not provide any kind of before/after view before you apply the filter you want. The filter does work pretty fast so this isn’t really a deal breaker, but it would be a nice feature. At $29.95, the Fisheye-Hemi is very affordable and provides very unique results.

Special offer for my readers

Order the Fisheye-Hemi for Windows, Mac or Aperture here and receive 10% off!

Enter coupon code: Savvy to receive a 10% discount on any purchase with Image Trends Inc. To purchase the Fisheye-Hemi Plug-In, click on the version you need below.

Buy Fisheye-Hemi Plug-In for the Mac

Buy Fisheye-Hemi Plug-In for Aperture (Mac)

Buy Fisheye-Hemi Plug-In for Windows

Special Thanks

I’d also like to give a special thanks to Paul Gardner and Camilo Arevalo for providing images for me to test the plug-in out with. You can visit their websites through the provided links, be sure to check them out.

What is TTL?

Most manufacturers’ automatic flash systems utilize through the lens (TTL) metering systems. TTL flash works in conjunction with whatever metering pattern you are using in your camera to evaluate the scene. It also receives the subject distance information from the lens and emits a “pre-flash” just before the exposure to judge exactly how much light is needed. The flash uses all of this information to automatically calculate how much power it needs to output to light the scene. Now keep in mind since TTL flash metering works off of your camera’s meter, it can run into the same limitations discussed in this article.

Using Flash in Auto-modes

Now the first major limitation you should know about when using flash in most automatic modes (including Program and Aperture priority; Shutter priority doesn’t count since you are picking the sync speed) is that by default, the camera will sync around 1/60. Some manufacturers will limit your sync speed to the reciprocal of your focal length (ie: at 125mm, your camera would sync at 1/125 sec.). The goal here is to eliminate the risk of blur from camera shake, but it often leaves you with a brightly lit subject and dark background.

Essentially, by picking a higher shutter speed, the camera is relying on whatever light the flash puts out to make the picture. This can be great in a situation where your subject is backlit because the flash will “fill in” and prevent the subject from appearing dark while retaining detail in the background. In dim or low-light situations, this can lead to that dreaded “deer in headlights” direct flash picture with only the subject being brightly illuminated. To prevent this, you can shoot in manual or use the next mode.

The “Slow-Sync” Flash

In automatic modes, most cameras have an option for “slow-sync” flash, or what is sometimes called “night flash.” By selecting slow-sync flash, the camera will sync at the shutter speed it would need without a flash. In situations where you want to capture more of the ambiance of the scene, slow sync is the way to go. The flash burst will usually freeze the subject, but your scene might be a little motion blurred so you might need a tripod depending on the situation. You can sometimes get around this by increasing your ISO or using a wider aperture. Below is an example of a shot with and without the slow sync option.

Slow Sync Flash

Left: ISO 500, f/5.6 @1/60 sec. Right: ISO 500, f/5.6 @ 1/20 sec.

Both of the above images were shot in aperture priority. The left is taken with the camera picking its default 1/60 second sync speed. The right is taken with the slow-sync option turned on, bringing the shutter speed to 1/20 of a second. The flash exposure was TTL (we locked the flash value to keep the flash exposure consistent), bounced off the ceiling. The first image is what most auto flash shots look like if your sync speed is high: the subject is lit but the background appears somewhat dark. This is because the higher sync speed is cutting out a lot of the ambient light. The shot on the right is 1 2/3 stops slower, resulting in nearly 4 times more light. This gives a good mix of the ambient light and flash, and looks more natural.

One last thing to keep in mind when using a slow-sync flash, you will often times have to deal with conflicting light sources. Your best bet here is to either use a custom white balance or color correction gel. Custom white balance does an okay job, but is not always perfect. In the shot I took, I used AWB and you can see hints of color casts from both light sources (flash and fluorescent). Gelling the flash is the only way to match the two color temperatures together. This article discusses the different color temperatures of different light sources.

Rear-Curtain Sync

Rear-curtain sync is when the flash pops off at the end of the exposure instead of the beginning. In the auto-modes, rear-curtain sync works like the slow-sync flash mode and allows the camera to utilize sync speeds below 1/60 of a second. Since the flash pops at the end of the exposure, rear-curtain sync is great for conveying a sense of action since it freezes the subject right as the exposure ends. I personally recommend using this mode for any longer exposures. This shot is an example of creating that sense of action.

Rear-Curtain Sync

A demonstration of rear-curtain flash sync. The exposure was 1/5 sec @ f/2.8 The camera was tilted during the exposure while the flash pop “freezes” the water in the fountain at the end.

High-Speed Sync

Most external hot-shoe flashes today support a mode called “High-Speed Sync” (or Auto-FP Mode). Most cameras today offer a sync speed of 1/200 – 1/250 of a second (any faster than that, chances are you’ll see the shutter blade in the shot). This is fine for most controlled situations but limiting in outdoor scenes where you need to shoot faster than 1/250. Without getting too technical, in high-speed sync the flash fires a series of smaller bursts during the exposure instead of one big burst. This allows you to sync at faster shutter speeds but reduces the output of your flash – meaning you need to be fairly close to your subject. (It should be also noted that this feature is generally only available on OEM flashes or 3rd party dedicated TTL flashes. The ability is also camera-dependent as well.) Here is an example of how a fast sync speed is useful outdoors:

High-Speed Sync

High-speed sync/Auto FP flash. Exposure of 1/500 sec @ f/5.6

Now this was shot with a Nikon D50, which actually allows a higher sync speed of 1/500 of a second (this is because it’s an electronic shutter, not a mechanical like most cameras). The flash compensation was dialed down a bit to add a subtle fill. The goal I had in this shot was not to eliminate the shadows, but merely soften them up a bit. Hopefully it will at least give you some ideas.

Moving to Manual

Once you have an understanding of the flash, I think the best way to work with TTL flash is in the manual mode. If you have a basic understanding of how exposure works and how TTL flash works, this gives you the most control over the scene. You have the most control in balancing the ambient light with the flash and can create whatever effect you’re looking for.

Some Final Quick Pointers

Practice makes perfect. The best way to learn flash photography is to practice. The more you use flash, the better you’ll understand it. Digital has made this much easier since you can see your results instantly.

A little diffusion goes a long way. Learning to diffuse the flash can make a big difference. Whether you’re shooting it through an object, or bouncing it off of a wall, it can give you a very different effect. One of my personal recommendations to get started is the cheap Sto-fen Omnibounce cap.

Move the flash off the camera. An off-camera flash cable can be extremely useful in moving the flash off the camera and giving a much different look. If you don’t like cables, you may want to see what wireless options your camera supports. Some manufacturers support wireless triggering from the pop-up flash. Once you get the hang of using the flash, I strongly recommend experimenting with off camera flash.

Good luck and happy flashing!

The SlingShot 200 AW is designed to hold up to a pro-size SLR with a medium zoom lens attached and about 2-4 extra lenses, as well as some other accessories. The main compartment loads from the side so you can swing the bag from your back to your chest and access your equipment.

SlingShot 200 AW Front

Like most camera bags today, the divider pads are moveable in order to allow you to customize the bag to your equipment needs. With some minor adjustments to the padding, I have no problem fitting my Nikon D200 with the battery grip attached and about 3-4 lenses or a flash. Rounding out the main compartment are a memory card flap and a built-in microfiber cloth that can be folded over your camera.

I’d recommend putting the two lenses you plan to access the most toward the top of the bag. By doing this, all you have to do is lift up one of the padding flaps to access your gear. Because of the depth of the bag, you can easily stack two small prime lenses and fit them in a single lens compartment.

The SlingShot 200 AW features two main accessory compartments. The first compartment on the front of the bag is great for holding extra batteries, cleaning supplies, or other small accessories. The second compartment sits at the top of the bag and has a decent amount of room. It’s great for holding non-camera related items, but I generally use it for an external flash and all of its accessories.

SlingShot 200 AW Back

The bag features a single padded carrying strap that hangs over your right shoulder. There is also a second small strap that clips into the main strap to prevent the bag from sliding around. I would say it distributes the weight much better than a shoulder bag, but not quite as well as a backpack. Even though the SlingShot 200 is comfortable, a fully loaded bag on a full day of shooting may leave you a little sore, but not as bad as a shoulder bag.

If the main compartments don’t quite hold what you need, the bag is fully compatible with the Lowepro SlipLock pouches. There is a holster on the main strap, two on the front part of the bag, and one on the right side. The front SlipLock slot is great for a memory card wallet or a small point-and-shoot case, while the others are perfect for any larger lenses that may not fit into the main compartment (ie: a 70-200mm f/2.8). The only thing I wish they would have included is a spot for a tripod. I have seen several people modify the bags to accommodate one, but it should have been on the bag.

Conclusion

The Lowepro SlingShot 200 AW is the perfect bag for someone who wants to go out shooting with a medium amount of gear. It is by no means a backpack replacement in terms of capacity, but its quick access makes it extremely useful in a lot of situations. I frequently use it in situations where I don’t need everything but want to be able to get at my equipment quickly. If you plan to carry a large zoom lens such as a 70-200mm f/2.8 or 300mm f/4 I would probably recommend looking into the SlingShot 300 AW, which has a little more depth to accommodate such large lenses. If you have a smaller body and maybe 1 or 2 lenses and want a smaller bag, the SlingShot 100 AW might be the best option for you. Overall, I would definitely recommend giving the SlingShot 200 AW a try.

Pros:

  • Easy access to your equipment without the stress of a shoulder bag.
  • Plenty of expansion slots for Lowepro SlipLock accessory pouches.
  • Comfortable shoulder strap with great padding.
  • All-Weather Cover for extreme situations.

Cons:

  • No access for larger lenses in the bag without adding pouches (or moving to the 300 AW).
  • No tripod attachment.
  • Sling style design might be a little awkward for some.

If you’re interested, Lowepro has a video demonstration here.